|
|
|
"Muffler" for your Tweeked Original Clarke
Please Note: The following instructions assume that you already own an Original Clarke or a "New-Style" Clarke that was tweeked for you by The Whistle Shop. You can purchase a Tweeked Original Clarke from us if you don't already own one.
This Muffler will not work properly with an Original Clarke that has not been tweeked!
Because of Clarke's unique sound blade design, it is possible to "fine-tune" the tone and volume with a "Muffler", after the windway has been flattened somewhat by our "tweeking" process. Clarke's Original-style whistles (not Sweetones) produce their sound by passing air over two different blade surfaces. Because the sound blade of an Original Clarke is bent in a "V" shape in the middle, the air passes over both the left and the right of the center of this bend, effectively producing it's sound in two different positions on the blade. If you restrict the air from passing over one of these two edges, the tone softens and the volume goes down (not to mention that the air requirements are reduced quite a bit). This idea is the basis of our "Muffler". You just need to cut a toothpick to the specifications below, then adjust it's position in the windway to your personal preference.
We suggest that you read this entire page before you begin.
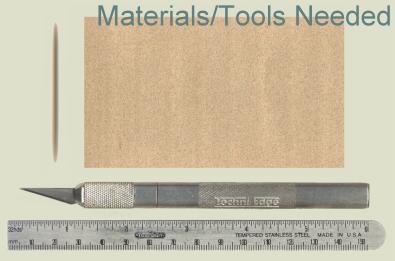
Materials Needed:
Lay the toothpick on a flat surface (like a piece of scrap board, work bench or cutting board). Begin by cutting off one of the tapered ends of the toothpick. Cut off the entire taper (around 10mm - see Figure 2). When cutting the Muffler to size, please be careful - remember that all of your fingers will still be needed to properly play your whistle when you're done ;o)
Holding the tapered end of the toothpick down with one finger, sand the top surface of the toothpick flat. Concentrate your sanding on the first half of the toothpick - the part that's under your finger will end up being discarded later. Toothpicks are soft wood - it will not take much sanding to get a flat surface. It should end up looking similar to Figure 2.5 (note that we have exaggerated the surfaces somewhat in Figure 2.5 for clarity - just sand enough to get a flat surface, you can always sand away more later if need be).
Turn the toothpick so that the flat edge that you just made is face-down and sand the opposite side flat. Work slowly - it's better to not take off enough than to have to start over because you took off too much. Also, try to keep the toothpick's thickness the same across the entire area that you're sanding. It should end up looking similar to Figure 3 (note that we have exaggerated the surfaces in Figure 3 for clarity).
Test the fit of the Muffler in the windway of your whistle, putting it at an angle similar to the one shown in Figure 5. Don't cut off the second tapered end yet - it's much easier if you have one tapered end left to hold on to, in case you need to sand a little more. Don't force it - if it doesn't fit, sand a little more. Once you start playing, the Muffler will expand some due to moisture, and should then fit snugly. The Muffler can sit at an angle across either side of the windway - sometimes you'll find that it fits or sounds better one way than the other.
Cut the toothpick off 23mm from the end that you cut off in the first step. Your muffler should now be complete (see Figure 4).
Keep in mind that you want the mouthpiece end of your Muffler to sit up against the outer wall of the whistle (to block the air from going in on that side - see Figure 5). The Muffler should stick out about 1mm from the mouthpiece end of the whistle. As you can see in Figure 5, you are effectively blocking the air from getting to one half of the sound blade. We find that it works best if the sound-hole end of the Muffler doesn't quite cover the mid-point of the sound blade. You should adjust the angle of the Muffler to your personal playing preference. Keep the mouthpiece end of the Muffler against the outer wall and adjust the angle until you find the tone that you're happy with. You can also adjust the length of the Muffler to your personal preference. The length that we use (23mm) seems to work fine. The Muffler needs to extend a little out into the sound hole (one millimeter or so). The extra millimeter that extends out of the mouthpiece does not interfere with playing, and makes it easy to remove when not needed. If you don't use your whistle or Muffler for a few days, you might find that the Muffler does not fit snugly anymore. Just put the Muffler in your mouth for a minute (or set it on a damp sponge). The moisture should swell the Muffler enough to again fit properly. You might also need to do this before you use your Muffler for the first time, to make sure that it stays in place.
We'd like to hear what you think of our Muffler. If you make one for your whistle (or if you have any questions as you're making it), please contact our Owner Thom via email.
The following Customer
Tip comes from Jeff Mueller:
|
|
|